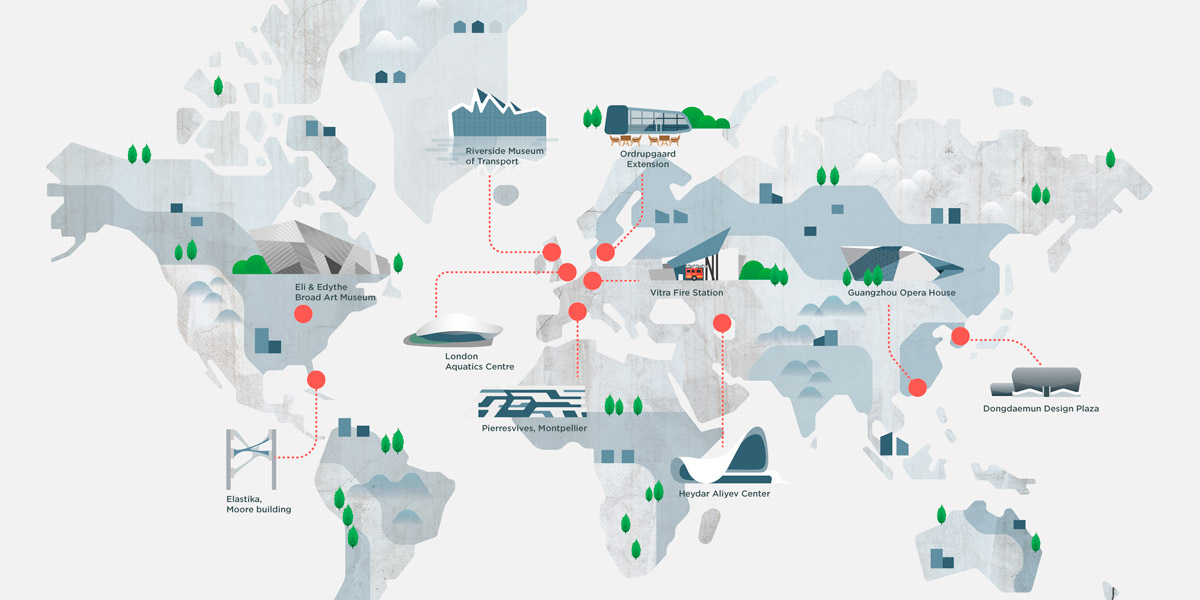
As an artist specializing in infographics, Jing Zhang has illustrated explainers on everything from credit card chips to rice cookers. But maps have a special place in her heart; for example, last year she travelled the world researching a global map series, the first of which is now live. In these short tutorial videos, Zhang demonstrates how she created a map of landmark structures designed by a bold visionary, the late architect Zaha Hadid.
Zhang made her map in Adobe Illustrator CC and pulled photos of concrete, metal and other textures from Adobe Stock to add depth to the map and to the icons representing Hadid’s buildings.
STEP ONE: OUTLINE LAND MASSES
Zhang placed a Google map on a layer in Illustrator for reference. On a new layer, she used the Pen tool to trace the basic outline of the world’s land masses.
While drawing the continents, she set the Fill to none. After she drew a shape, she selected it with the Direct Selection Tool and hit Shift-x to swap the Fill and Stroke. That swap allowed her to use the Live Corners widget to round the shapes’ angled corners. (Click here for step-by-step instructions on using Live Corner widgets.) Once she rounded a shape’s corners, she hit Shift-x again to return to a Stroke and a Fill of none.

STEP TWO: VISUALLY PARTITION THE CONTINENTS
Zhang wanted the map to compliment Hadid’s signature style, so she layered what she calls “partitions” on top of the land masses. These shapes don’t strictly follow human or natural boundaries; rather, they’re inspired by Hadid’s aesthetic.
Again using the Pen tool and Live Corners, Zhang drew the partitions. To make it easier to work with all the shapes, she organized elements into layers and groups. She applied colors from the swatch panel.
Watch the video to see how Zhang applied a Clipping mask (Object > Clipping Mask > Make) to use Live Corners on partition shapes while maintaining the irregular detail of the continents.

STEP THREE: APPLY TEXTURES TO THE MAP
Zhang gave the map base an extra level of detail by adding realistic textures.
Although Zhang pointed her browser to the Adobe Stock website to search for texture photos, there’s no need to leave Illustrator—you can search Adobe Stock inside your CC Library panel.
After Zhang found a texture she liked, she licensed the image and it was automatically saved to her CC Library. She drag-and-dropped the image from the Library into her open map and scaled the artwork to fit.
Next, she selected both the shape and the texture and clicked on Opacity in the Control bar. She clicked on Make Mask to generate an opacity mask. This kind of mask retains the color she’s already applied and allows the texture to show through. (Check out more information on opacity masks.)

STEP FOUR: CREATE THE BUILDING ICONS
Once she was satisfied with the base map, Zhang searched Google for reference photos of the landmark buildings. “I looked for the most recognizable and interesting angles of the buildings,” she says. “Then I thought about how to emphasize and focus on the character of the building. For example, the Eli and Edythe Broad Art Museum has some interesting pleated facade of stainless steel and glass. It is perhaps the most angular form of all Zaha Hadid’s work. To represent this, I used stripy metal textures to fill up the structure.”
With the Pen tool, Zhang constructed a geometric representation of the Eli and Edythe Broad Art Museum using separate shapes as building blocks. She colored each shape a different shade of gray and then applied Adobe Stock photos of metal to the shapes using opacity masks, varying the photo’s rotation and scale each time.
For this stage, Zhang drag-and-dropped unlicensed photos, which have watermarks. Later, she licensed the images by right-clicking the image thumbnails in her CC Library. The placed photos auto-updated to the full-resolution, watermark-free files.

To create the Glasgow Riverside Museum of Transport icon, Zhang drew the building with the Pen tool, selected it, and dragged it to Symbols panel to transform it into a dynamic symbol. She dragged a copy of the symbol below the original, then chose Transform > Reflect to flip it 180 degrees.
Zhang’s goal was to make the upside-down symbol look like a reflection in water. (Remember, this museum is by a river.) To enhance that effect, she drew a new box with a fill, placed it over the upside-down building, and in the Gradient panel, she applied and adjusted a gradient. Next, she selected the gradient and upside-down building and made an opacity mask.
As a final touch to the Riverside Museum icon, she drew and placed rectangles to evoke ripples in the water and simultaneously rounded all of the rectangles’ corners.

To give the Dongdaemun Design Plaza icon an appearance similar to the actual building, Zhang used Illustrator’s Rectangular Grid tool (in the flyout under the line tool). She selected the tool, made a grid, and then navigated to Object > Envelope Distort > Make with Warp and kept the default Arc warp option. She then moved the grid below icon, selected part of the icon and the grid, and made a Clipping Mask.

STEP FIVE: BRINGING IT ALL TOGETHER
To make the piece look more like a conventional map, Zhang drew a few trees, mountains, and basic house shapes. “There has to be some life,” she notes. “Architectural subjects can be cold and lifeless otherwise.”

She then copied and pasted the building icons from a separate file onto a new layer in the map document. She drew simple red circles at the buildings’ geographic locations. When an icon wouldn’t fit near its red dot, she drew a line with the Pen tool, went to the Stroke panel, and selected the dashed line option. Hadid was known as the “queen of the curves,” which Zhang honored by carefully curving any dashed line angles as a final touch.

Want a closer look? Click the image above to download the final infographic as a PNG file, or click here.
“I always had great admiration for Zaha Hadid’s work,” Zhang says. “Her sudden death in 2016 left a black hole in the world of design that is too big to fill. This map is my tribute.”
Read more about Jing Zhang.
March 15, 2017