
Maurizio Sergiusti can turn just about anything into art. He intercepts debris otherwise headed for the landfill and recycles it into sculptures that range from fish to Freddy Mercury. He's even made an entire alphabet out of junk, and recently, he not only told Adobe Create the source of the letters (the Z incorporates spaghetti tongs!), but how he animated them in Adobe Photoshop CC.
"I really liked the idea of creating a material variant of alphabets in a world that now uses only the computer," explains Sergiusti, who lives in Sardinia, just a few miles from the Italian island's eastern shore. He looked through his collection of broken bits, which he stores in a warehouse behind his home, and found plenty to work with. He left most of the pieces intact, only occasionally cutting them down, and put them together like a typographic puzzle. "In some cases, I enlarged or tightened the dimensions in Photoshop to get the letters visually homogeneous," he says.
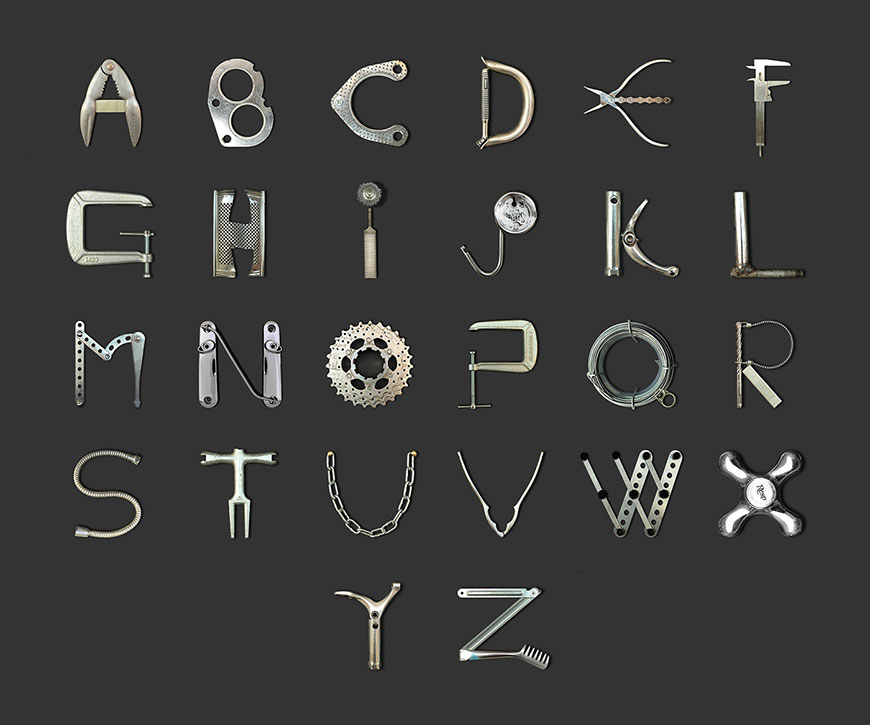
Sergiusti says that the letter C came from an o-ring for a motorcycle air intake; the M is composed of parts of a game belonging to his son; the N combines motorcycle footrest supports and a "bar of origin unknown to me, found in an illegal dump"; the W is probably a broken trivet ("found along a country road...what was it doing there?"); and the Z is made up of a spaghetti tong and a hinge from a painter's easel.
ANIMATING "OMG!"
Sergiusti brought his analog creation into the digital space by photographing each letter. He decided it would be fun to animate a few characters, and he began with O. Opening the photo of the letter in Photoshop, he duplicated the image three times for a total of four layers. He then rotated each duplicate layer in 90° increments from the previous frame. Because the toothed wheel is irregular, the motion wasn't smooth enough for his liking, so he then manually tweaked each layer's position.
Next, Sergiusti went to Window > Timeline, chose Create Frame Animation in the Timeline panel, and selected Make Frames from Layers from the panel's drop-down menu. He set each of the four frames to appear for one-tenth of a second. The shorter the time, the faster the movement, so one-tenth of a second gave the O a fluid appearance.


Because Sergiusti wanted the letter M to have a fixed part and a moving part, he isolated the right leg on its own layer, then duplicated the layer several times, changed the leg's angle by 12.5° in each layer, and converted the layers to frames in Photoshop's Timeline panel.
As he did for the letter O, Sergiusti set the letter M's animation to repeat forever. However, he didn't set all the frames to appear for the same duration. The frames in which the leg is at 25° counter-clockwise and 25° clockwise appear for a little longer than the other frames to create a pendulum effect. "The sides of a pendulum must respect the inertia time that occurs before the change in direction," Sergiusti says.


Sergiusti created the letter G's movement in two stages; the first was what you see here, and the second occurred after he joined the characters into "OMG!" so as to better synchronize with the other letters.


The exclamation point began life as a rasp. He used two Photoshop layers to create its simple up and down motion. To make the ball rotate, he repeated the steps he used for the letter O.


His final steps were to copy each frame from the Timeline panel into a new Photoshop file (see the step-by-step instructions) and then fine-tune the duration of the frames until he was happy with the overall animation. He saved the file as an animated GIF.


To keep up with Maurizio Sergiusti's future projects, follow him on Behance.
April 9, 2018