Want to learn some Dimension basics before you get started? Check out these tutorials.
Typically, creating an attractive 3D packaging mockup involves many complicated steps. But with Adobe Dimension, you can bypass many of those steps and easily create picture-perfect results ready to present to a client or share with an art director. And Dimension not only gives you complete creative control but also integrates seamlessly with Adobe Illustrator and Photoshop.
Follow the steps in this tutorial to create your own 3D packaging mockup for a cosmetics line, using Dimension, some free Adobe Stock 3D assets, and elements from two free Illustrator templates.

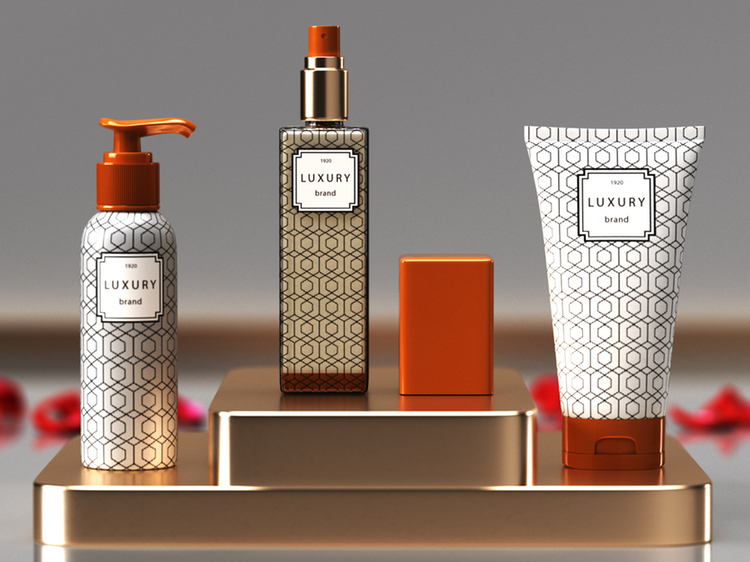
Use Dimension and free assets to create this product-packaging mockup.
STEP 1: DOWNLOAD THE ASSETS
Download Dimension and Illustrator; then download the following free assets from the Adobe Stock marketplace:
STEP 2: STAGE THE 3D ASSETS
Open Dimension, and drag a Plane, a Cube, and a Rounded Cube from the Starter Assets panel into your scene. Duplicate the plane and rotate that duplicate by 90 degrees on its x axis. Reposition both planes to create a wall and a floor.

Click on the image to see how an object is positioned and sized.
Then rescale and reposition your cube asset so it looks like detailing on the bottom the wall. Duplicate the rounded cube, scale the duplicate, and reposition it so that it sits on top of the first cube, forming steps. Then drag in the Squeeze Tube and Pump Lid assets, and use the move tool (or press V) to position them on each side of the rounded cubes.
Then select File > Import 3D Model and import the free Rose Petals and Pump Cosmetic Bottle assets you downloaded previously. Place the cosmetics bottle at the top of the steps, and then place the petals in the background. Duplicate the petals as many times as you like to create your desired effect.
STEP 3: CHOOSE YOUR GRAPHIC ELEMENTS
Open the Bold Geometric Patterns Illustrator file and create two new artboards. Choose a print, copy it, and paste it into one of your artboards. Open the Elegant Logo Kit file and choose a frame and text; then paste them into your second artboard. Save your file (as a .ai file) and close it. You will be able to adjust and scale your graphic elements further down the line.
STEP 4: CUSTOMIZE YOUR SCENE
You can now begin to apply materials to the objects you’ve placed in your scene. Go to the Materials section of Dimension’s Starter Assets panel, and simply drag and drop materials onto parts of your objects. After adding a material, you can also double-click on the surface of the object to change its properties, such as color, opacity, roughness, and more (in the righthand panel).
STEP 5: APPLY DECALS
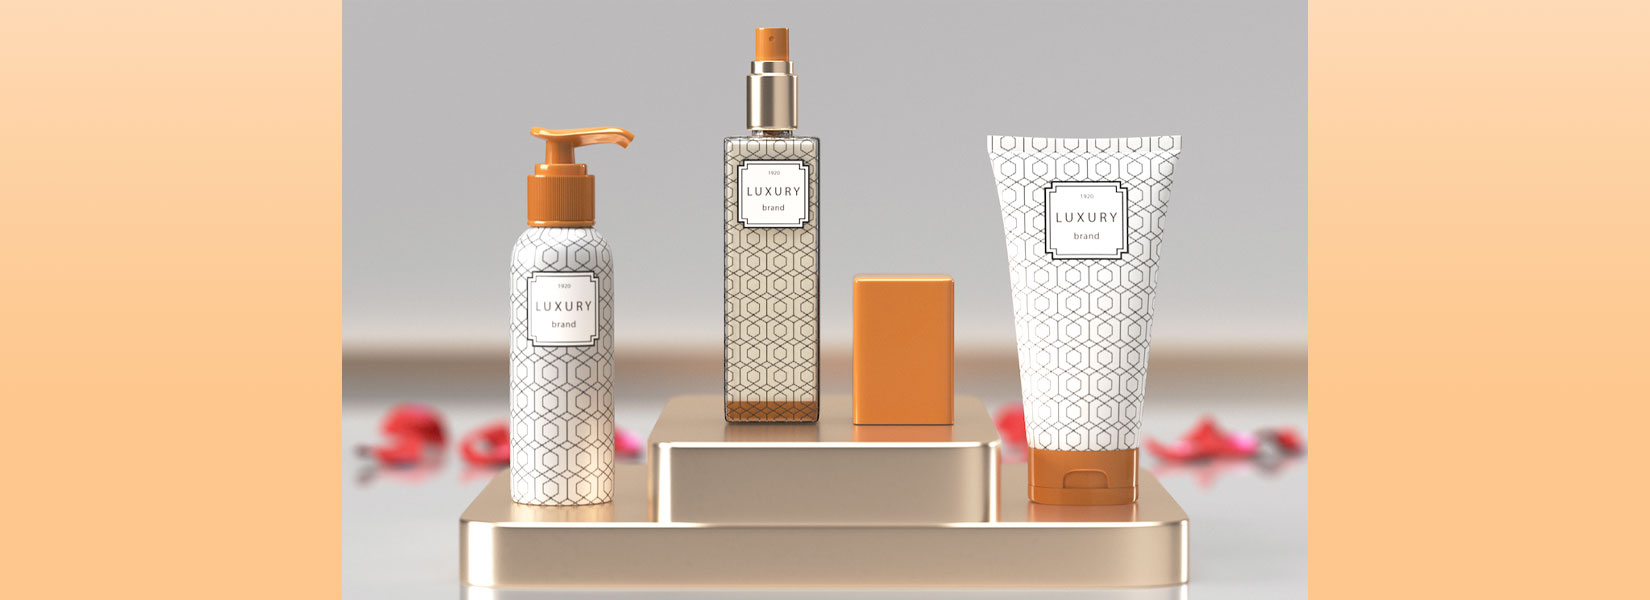
Now you can add the graphic elements you chose earlier to the objects in your scene. Double-click on the squeeze tube to open the Materials section of the Assets panel, and under the Actions tab of the righthand panel, click on the square icon (or choose File > Import > Place Graphic On Model) and select the Illustrator file you saved earlier. Clicking on it will automatically apply your first artboard to your object. In order to select another artboard, click on the image and select one of your new artboards.

Click on the image to see how a graphic is placed and sized on a model.
From there, you can reposition and rescale your design to fit perfectly onto your object. If you are not satisfied with how it looks, you can edit the design by clicking on the pencil icon next to your decal. This will open your file in Illustrator, where you can make as many changes as you’d like. Just be sure to save and close your Illustrator file once you’re done. Do this for all three packaging objects until the brand’s visual identity is coherent and presented correctly.
STEP 6: PLAY WITH CAMERA PERSPECTIVE AND BLUR
To make the final image look more like a product shot, make sure Camera is selected (under the Scene dropdown menu in the righthand panel) and find Camera Perspective in the Properties pane. Change the Field Of View setting to 15 if you want to make it look like your camera is zooming in. Then experiment with the Focus setting to slightly blur your background. Pick the object in the middle as your focus point and set the blur amount to 15 for a slightly erased effect.
STEP 7: RENDER YOUR SCENE WITH VARIOUS CAMERA BOOKMARKS

An advantage of Dimension is that you can capture and render your scene from multiple angles, just like you would in a traditional photoshoot. To do this, move around your scene and bookmark the best camera angles while giving them descriptive names.
When you feel like you have a finished product in front of you, switch from Design mode to Render mode, in the top left menu. You can choose to render one of your saved camera views, or all of them at once. It’s usually better to choose the Low (Fast) resolution setting if you’re still unsure about your final design. Otherwise, choose the High (Slow) setting, and click on the Render button. We also recommend exporting your scene as a .psd file, which will give you more creative flexibility if you plan on doing any kind of post-processing in Photoshop.
Ready to experiment on your own? Check out these Adobe Stock models meant for cosmetics-packaging products (many are available for free).