
Designer Jenean Morrison is best known for her colorful, intricate pattern designs and paintings. She recently opened a multipurpose brick-and-mortar space (studio, gift shop, and art gallery) in the Cooper-Young area of Memphis, Tennessee, where she creates and sells her own line of vibrant, patterned stationery, gift wrap, home décor, and fabrics. She works in many styles, using many techniques; for this tutorial, we asked her to focus on creating a repeating pattern suitable for printing on fabric, using Adobe Illustrator Draw and Adobe Illustrator.

And then—because making art for its own sake is great, but making money is nice, too—we asked Spoonflower merchandising manager Tara Reed for some tips on creating patterns (for fabric, paper, and more) to sell via the popular print-on-demand marketplace.
MAKING A REPEATING PATTERN
Here, Jenean Morrison walks us through her process for creating a gorgeous, complex repeating pattern (to simplify your pattern, you can choose to work with fewer elements):
STEP 1: I began this project by drawing multiple stylized flowers in bright, happy colors on my iPad Pro.

Click to watch Morrison fill an iPad screen with bright flowers.
I drew each flower on a separate layer so I could easily group and separate the flowers in the next step. I like to start my projects by drawing directly on my iPad Pro, which I use as a sketchbook. Because it’s digital, I can save multiple versions of drawings. Mistakes are easy to erase, so I feel free to experiment and play around. I like to work in Adobe Illustrator Draw because the artwork is vector, making it scalable to any size without loss of resolution.
Morrison says, “I always draw more elements than I end up using.… This gives me a choice of which motifs to use in the final artwork. Plus, the more I draw, the better the art gets and the more the ideas flow. For this project, I filled up three iPad documents with flowers in a variety of styles, sizes, and coordinating colors.”
STEP 2: After drawing all of the elements on my iPad, I used Draw’s Send To Illustrator function to send the projects to Illustrator. I love the ease of being able to create the elements on the go or on my couch, and then send them to my desktop to create the pattern.
Once she was happy with her floral elements, Morrison sent them to Illustrator, so she could continue working there.
STEP 3: The Send To Illustrator function in Draw sends the iPad document to my desktop and automatically opens it in Illustrator. For each document, I locked all the layers, via the Layers panel. I then unlocked each individual layer, one at a time, to group the elements on that layer (drag your cursor over the unlocked elements and then select Object > Group, or press command-G).
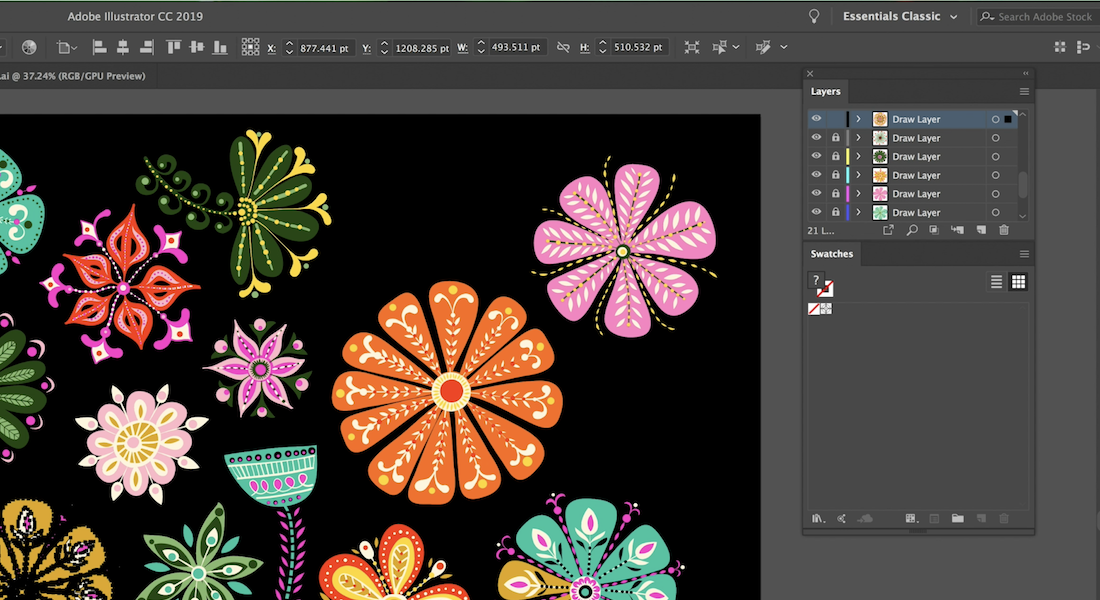
Morrison locks all the layers; then she unlocks each layer, one by one, to group that layer’s elements.
If you’re not sure which elements are on which layer, you can drag your cursor across the entire artboard; this will select only objects on the unlocked layer. You can also make layers visible one by one, to see what each contains.
This step can be a bit repetitive and time-consuming, so make sure to save your iPad documents as .ai files after you’ve grouped your flowers. I often pull elements from different documents, so it’s nice to have a saved version where the flowers are already grouped.
STEP 4: I created a new 18-by-18-inch document, which will be the size of one square of my repeating pattern. I then unlocked, copied, and pasted all of the artwork from my three iPad documents into the new document.

Morrison copied her flowers into her new document, placing them to the sides of her artboard, for later access.
I resized the elements to make them fit the screen; then I put them off to the sides of my artboard. I saved the new Illustrator document and gave it a name.
I like to have all of the assets visible and scattered to the sides of the actual artboard as I work, and I generally like to have an abundance of elements to choose from, especially when making a complex pattern like this one.
STEP 5: I set my keyboard increments to 18 inches (Preferences > General)—you will see why this is important when we get to the next step. Using the Rectangle tool, I created a black 18-by-18-inch square to act as the background for the pattern. I aligned the box to the artboard and then sent it to the back of the document (Object > Arrange > Send To Back). I locked it in place and then selected the artwork elements and confirmed that they were in front of the black background (Object > Arrange > Bring To Front).
Morrison says, “There is nothing I love more than a dark background for a floral print. The colors really pop against the dark background, and I think it gives the pattern a touch of drama to go along with the whimsy.”
STEP 6: I began moving flowers onto the artboard, starting with the edges, which will have to line up when I multiply the squares into a pattern. After placing an element on the edge, I copied it and pasted it in front (Edit > Paste In Front, or command-F) of the original; then I used one of the keyboard arrow keys to send the duplicate exactly 18 inches to the opposite side of the artboard (this works because I set my keyboard increments to 18 inches in the previous step).

Set your keyboard increments to the width of your pattern square. Then when you copy an edge element, paste it in front of the original and use an arrow key to send the duplicate to the other side of your square.
After placing the elements on the edges, I filled the interior with a mix of small and large flowers. This is my favorite part of making a pattern!
I try to make sure that elements near each other aren’t too similar in size, shape, color, or style. And I like to stagger and scatter the flowers so that they aren’t directly side by side. This will make the pattern flow better once completed and will prevent the flowers from looking like they are in rows. I do a lot of rotating, resizing, and moving of the elements to make them all fit in the design area.
An important thing to remember is that if you change the size or shape of any elements on the edge of your square, you must do the same thing to the corresponding flower on the opposite side of the artboard. I often select both flowers and move them at the same time. If I’m resizing or rotating, I like to eliminate one of the pair, perform the actions on the remaining flower, and then copy and paste.
Some designers like to take their elements just to the edge of the artboard without going over the sides. This works fine for less complex patterns, but when you’re working on something as dense and full as this pattern, I feel that it’s important to incorporate this technique. Otherwise, you will always be able to see a small visible square around your pattern. This technique makes the pattern flow better and appear more seamless.
STEP 7: After distributing the elements, I unlocked the dark background square. I then copied and pasted an identical square behind it. This square needs to have no fill and no stroke. I then selected everything on the artboard and dragged it to the Swatches panel, releasing once my cursor was hovering over the panel.

Watch as Morrison turns her single sqaure into a swatch, so she can see how it will look when it repeats—and make adjustments accordingly.
STEP 8: After dragging the pattern swatch to the Swatches panel, I made a large rectangle using the Rectangle tool. I clicked on the newly created swatch to fill the rectangle with it. At this point, I like to zoom in and make sure I don’t have any mistakes on my seams. If I’ve missed something, I’ll notice because the pattern won’t unite seamlessly. I also like to zoom in on and out from the pattern, resizing it so that I can see how it looks at different sizes. Sometimes I may have inadvertently put two elements close together that are similar in both style and color. Other times I might see obvious gaps.
If I see anything I want to change on the pattern, I make the changes and then drag a new swatch to the Swatches panel. I then test again to see if I like the changes. I like to make multiple swatches—as opposed to modifying the original swatch—because sometimes I take the changes too far and want to get back to the original swatch. So I create new swatches until I’m happy with the result, and then I delete the older swatches.
I can now use the pattern to fill shapes. And since it was created in Illustrator, there is no limit to the size. I can use this pattern for something small like a cell phone case or something large like wallpaper or bedding!
SELLING A REPEATING PATTERN
There are a variety of online marketplaces that let you upload a design and offer it for sale on fabric and other goods. For those of you who are making a repeating pattern that you’d like to sell via an on-demand printer, Spoonflower’s Tara Reed has some tips on standing out in a marketplace:
TIP 1: Think seasonally: “Trends can be very cyclical and seasonal,” says Reed. “An easy way to get ahead of a trend is to think forward—what holidays are coming up? What's the season? At the moment, I’m seeing designs with bunnies trending upward, because Easter is on the horizon. I’m seeing a ton of baseball designs, too—no surprise, since baseball season is starting.”
TIP 2: Pay attention to design trends—look at what you’re seeing in the world of design, and think of how you can incorporate those ideas in your pattern. Reed says, “Trends I’m seeing right now are Art Deco, geometrics, oversized florals, mermaids, birds, cacti, and fruits. Large-scale designs have been on the rise, probably due to the growing popularity of removable wallpaper. In terms of color, coral got a huge boost by being Pantone’s color of the year.”
TIP 3: Give your design an easy-to-search-for name. Reed says, “I always tell designers to ‘think like a shopper’ when titling their designs and adding tags (Spoonflower lets you add 13 tags to the designs you upload). What search terms might a shopper use to locate your design? The most important descriptors would be the subject or theme of the design, its color, and its scale.”
Get more tips on the Spoonflower blog.