
Have you ever had a hard time finding just the right greeting card for a special occasion? Maybe it’s time to experiment with making cards yourself—and who knows: someone else might be looking for that kind of card, too. In this article, I’ll show you how easy it is to turn your hand-drawn art or lettering into print-ready greeting cards, using Adobe Capture and Adobe InDesign. Then I’ll share some ideas on where to get them printed so you can sell them online or at a local boutique!
CHOOSING A THEME
The first step to creating a card is figuring out its theme—this will help you get focused on the kind of artwork you want to create. Here are some quick ideas for greeting card themes to try:

Birthdays, anniversaries, love, and thank you: These are typical occasions for people to give greeting cards to friends and loved ones, so if you plan to try to sell your cards onine or get them into boutiques, think along these lines. Sellers and buyers are likely to be looking for these types of cards first.
Unique occasions or milestones: Are there certain unique occasions you celebrate, or is a milestone that someone in your life is about to hit, that there are just no commercial cards for? Other folks out there might be looking for the same kind of card! Whether it’s something as specific as celebrating the day your roommate (who becamse your best friend) moved in, or congratulating your sister on finally learning how to drive, great products usually start with makers designing things they wish existed!
Funny expressions or puns: A great way to use greeting cards to show your personality and showcase your art is to work with funny expressions and puns—the more unique the better!
CAPTURING YOUR ART
A quick and easy way to get your artwork from paper to artboard is to use the Adobe Capture mobile app; it lets you turn hand-drawn art and lettering into a vector image on your desktop with a few clicks. (Of course, you can also just start with digital artwork if you have it! If you're doing thta, skip ahead to the InDesign section.) Here’s how:
Step 1: Open up the Adobe Capture app, select the Shapes menu option, and take a photo of the artwork. This works best for things like lettering or line art.
Step 2: After Capture captures your art, you’ll have the option to refine and crop it—use the Erase tool to remove parts of the artwork, or crop judiciously.
Step 3: Now that you have your artwork turned into a vector image, you can export it as an image, SVG, or PDF file; you can save it to a Creative Cloud Library to open in Illustrator (or Photoshop); or you can save it to your camera roll to access later.
Step 4: Voilà! You can finalize your artwork in Illustrator and have it ready to be placed into InDesign later.
SET UP YOUR CARDS IN INDESIGN
Now that you have your artwork in Illustrator, it’s time to set up your greeting card file in InDesign. For best results, work with a standard card size—this affects not only postage but also your ability to find envelopes for your cards! The most common sizes for greeting cards are:
- 4¼ by 5½ inches (fits in an A2 envelope)
- 4½ by 6⅛ inches (fits in an A6 envelope)
- 5 by 7 inches (fits in an A7 envelope)
For this example, let’s work with the standard 4¼-by-5½-inch size. This is a standard file setup; if you’re working with print-on-demand websites, it’s always best to find out if they have ready templates or specific formats to work within.
Step 1: Create a new print document in InDesign. Since we’re doing a single-fold card, it’s best to set up your file as separate pages. Create a two-page document, with each page being 4¼ by 5½ inches. Include a 0.125-inch bleed, which is a typical requirement for print production.
Step 2: For this card, we’re adding a background color. Using the Rectangle tool, create a colored rectangle and enlarge it to the size of your canvas, bleed included.
Step 3: Insert your vector artwork using the Place tool. As you place your artwork, you can also use the Text tool to add text elements to your card. In this canvas, the right page is the front of the card, and the left page is the back of your card. Since we’re making a single-side printed card (with a blank interior for people to write in), you’ll want to add your logo or website to the back of the card—so buyers will know where to get more!
Step 4: Export your card. Find out what file formats your chosen printer requires—you have the option to export the files as print-ready PDF files, or as JPG files for uploading to print-on-demand sites. You can also choose to export as single pages (front and back) or as spreads (front and back as a single side).
FROM PROOF TO PRINT
There are several places to get your cards printed, depending on the quantity you want to produce, and how you plan to take these to market.
Print on demand: The easiest, most cost-effective way to test new cards before having them printed in bulk is to go the drop-shipping route with print-on-demand websites. You upload your artwork, and they do the rest—when an order is placed, they produce the item for you and ship it. Not only do you avoid having to spend on production for cards you’re not sure will sell and worry about inventory; you also won’t be stuck shipping orders all day if your business does take off!
Websites like Society6 and Gooten allow you to upload your work and give you several options for your cards. I like Gooten for its variety of sizes and paper (you can choose paper weight and coating!), and you have the option to order boxes of one to 100, too.
Online or local printers: If you’d rather have cards printed, and do the shipping and packaging yourself, you may opt for online or local printers. Moo can do small batches of greeting cards, and you can choose to have each card in the pack have a different design on it (good for testing artwork!). Online printers like Smartpress will let you input sizes and paper weight along with quantities and will give you price quotes for each. You can also visit local printers in your city and inquire about their minimums, but most places will require at least 100 pieces per design to start. Typically, the bigger the quantity, the lower the price, so you’ll want to pick this option only once you’re sure of your artwork.
PRICING AND PITCHING
You finally have printed cards in hand—now what? Here are a few tips on selling your greeting cards, from how to price them to pitching to your favorite local shops!
Price your cards: The formula when calculating costs for a product is usually your materials (cost of printing) + labor (your time) + overhead (website subscriptions or tools you used) + intended profit (up to you!) = wholesale price. Ideally, you’ll want to double this to get to your retail price. If you’re not sure where to start, walk around your favorite stationery store or boutique and see how much high-quality cards are going for—it’s likely around $4 to $6 each, depending on size, production processes, and brand. A number around that range should work as your starting out—just make sure you aren’t pricing your work too low!
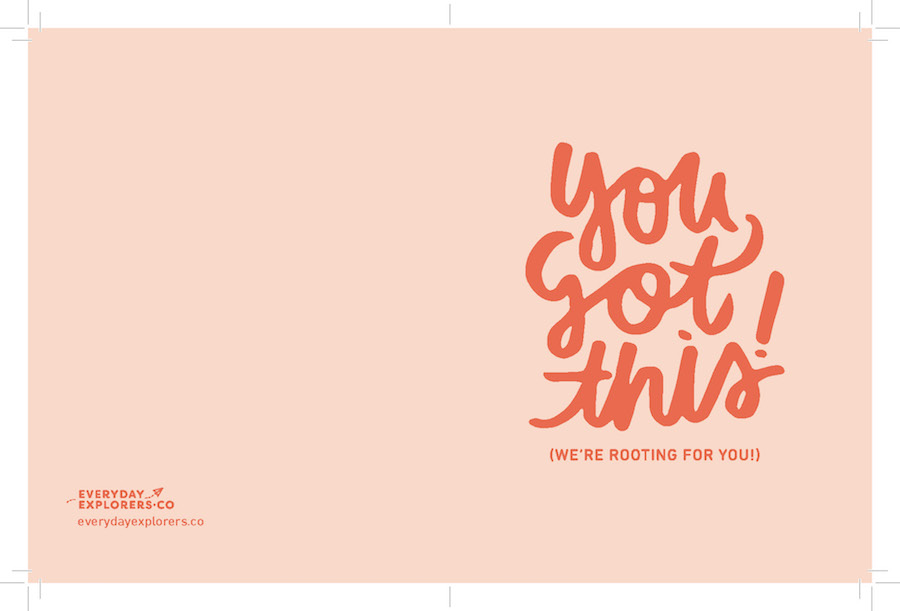
When you design your single-fold, blank-interior card, the left side will be its back; the right, its front. Setting your card up in a standard size will make it easier to find envelopes to go with it.
Set up shop online: You’ll want to establish some kind of online presence, whether it’s posting about your cards on your personal Instagram or Twitter feed (or creating new accounts for them). Take good photos of your cards, share them with your friends and family, and let the world know where they’re available and how to buy them. Better yet, start sending them out yourself! You can set up an Etsy or Shopify shop (this integrates well with Gooten and other print-on-demand sites) or sell them via Facebook to people you know.
Pitch to local shops and boutiques: Wouldn’t it be great to find your greeting card on the shelves of your favorite boutiques? Be sure to have a few things ready to present before you pitch:
Pitch to local shops and boutiques: Wouldn’t it be great to find your greeting card on the shelves of your favorite boutiques? Be sure to have a few things ready to present before you pitch:
- A line sheet with wholesale prices: Have an overview of all your products with their corresponding wholesale prices for quick reference. You want to make it as easy as possible for buyers to buy from you. The more product choices you have, the better the chances—don’t present them with a catalog of only a couple of designs.
- A list of terms and minimums: You’ll want to require that stores to buy a certain amount or number of cards for wholesale—packs of 10 or 20, or maybe a minimum order amount of $50 or $100. Make sure to write your terms out clearly—who pays for shipping, your turnaround time for getting orders in, and when payment is due.
When you find shops you’d like to pitch, do a little research online to find out whom you should contact. You can also ask for a contact when you walk into the store—but don’t try to pitch them right there and then. Get an email address, send them your line sheet and catalog, and ask if you can send them samples with a follow-up after a few days. And get creative on where to sell your cards—stationery shops and bookstores are great, but you can try pitching more unconventional places like coffee shops, museum shops, national park souvenir shops, and even hospital gift shops!
Former Adobe Creative Resident Christine Herrin is a designer and letterer, and the founder of the Everyday Explorers line of craft and stationery products.
June 11, 2019