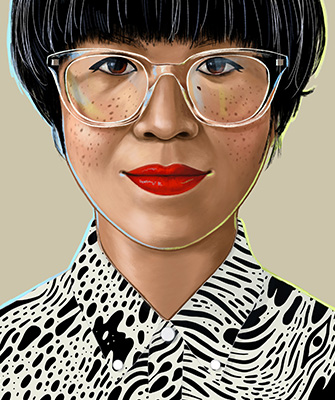
Colorful art and looping animations come together for a striking composition in Adobe Photoshop. See how digital painter and pattern designer Shyama Golden makes a fun illustration more interesting with animated patterns.

Shyama Golden’s paintings exist between the cute and the uncanny, inviting the viewer to discover new details through multiple viewings. Her work is influenced by science, graphic design, and the artistic tradition of magical realism. Learn more about Golden and her work in this video profile.
Take a one-minute look at Golden’s process—the steps are written out below.
Before You Start
Use these sample files if you’d like, or practice with your own. We provided a Photoshop document with masks over parts of the image so you can focus on animation techniques.
Step 1: Scale to Size
To make sure the images she placed scaled properly, Golden set the general preferences by deselecting Resize Image During Place (Edit > Preferences [Windows] or Photoshop CC > Preferences [macOS]).
Step 2: Pick a Pattern
Next, Golden placed the pattern as an embedded image (File > Place Embedded) to the Right Front Panel layer group, just above the RIGHT side layer. Photoshop placed the image as a Smart Object. She then right-clicked on the pattern layer and chose Create Clipping Mask so the pattern fit within the shirt panel.
Step 3: Prepare to Animate
When Golden was ready to animate the pattern, she opened the Timeline (Windows > Timeline) and dragged the playhead to the 00 mark. Then she selected the shyama_golden_pattern layer in the timeline and moved it to align with the playhead.
Step 4: Transform Your Art
To define the animation properties, Golden twirled open the pattern layer and clicked the stopwatch for the Transform property to create a Transform keyframe.
Then she dragged the playhead to 05:00 and pressed Control-T (Windows) or Command-T (macOS) to open Free Transform. She clicked the pyramid in the Control Bar to use Relative Positioning for the reference point—this converted X and Y to 0.00 px. She changed X to -500 and Y to 500 to move the pattern down and to the left. In order to get a perfectly looping animation, it is important to set the coordinates in increments of 500.
Golden completed the animation by clicking the checkmark, which created a new keyframe. Finally, she selected Loop Playback from the Timeline’s flyout menu and clicked Play to test the animation.
Make Some Waves
Liven up the composition by adding patterns to other parts of the illustration. Experiment with changing the positioning of the pattern in each section to create alternating waves of animation.